We model 1/8 scale. Standard gauge in the real world is 56.5 inches. Divide that number by 8 and we get 7.0625 inches. That is 7-1/16 exactly! That is the correct gauge. Nobody uses it anywhere!
When the hobby started in merry old England 7-1/4 inches became the standard. All the drawings were in fractions, so if you are using an old wooden yardstick to measure everything, I guess that makes sense.
Most 1/8 scale railroads around the world use 7-1/4 inch gauge, including the northeastern part of this country. Even Walt Disney built his railroad in California to 7-1/4 gauge. So why the f*** is most of the USA using 7-1/2 inch gauge????
The “why” doesn’t really matter anymore. The problem exists and we are all forced to deal with it.
If you never ever travel with your trains, different gauges don’t matter, until you want to sell your train. You can run your trains on your home track to your hearts content. This hobby is very social. We like to take our trains to other tracks to run. My 7-1/4 inch gauge home track is the Finger Lakes Live Steamers in western New York State. I can take my trains to Mud Creek (Buffalo), Adirondack (Saratoga Springs), Long Island, Pioneer Valley or Waushakem (MA), New Jersey, Pennsylvania and a few other tracks in the Northeast and southern Canada.
But suppose I want to go to Florida in the winter; or Ohio – just five hours west of my home. There are some nice tracks in Michigan and the Midwest. Sorry they are all 7-1/2 inch gauge.
The Northeast is densely populated and the live steam clubs are old. Finger Lakes celebrated their 50th anniversary this year. There are hundreds or maybe even thousands of engines and cars gauged to 7-1/4 inch. Then there is the track. Finger Lakes has 12,096 feet of 7-1/4 inch gauge track as of this writing along with over 80 switches. If we figure an average of 3-1/2 ties per foot with 3 screws per side; to re-gauge the track to 7-1/2 inches, we would have to move 127,008 screws in 42,336 ties! Of course if we had to turn the ties over or replace them, just double the number of screws. I don’t think anyone would be anxious to re-gauge their railroad.
I have heard of a few railroads that accommodate both gauges, but it requires some pretty precise track work, especially on the switches. If it were really feasible, I think there would be more than just a few tracks out there.
So, the solution to running on both gauge tracks is to make dual gauge trains.
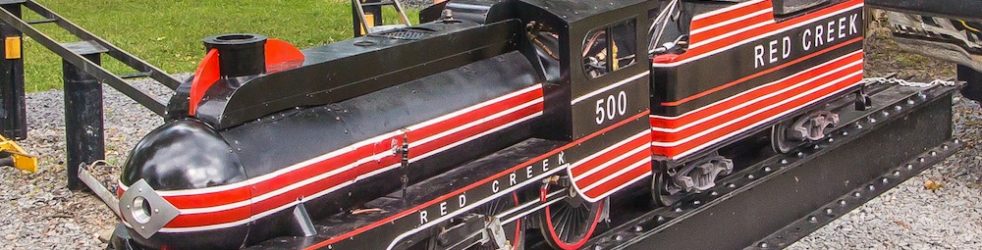
The big advantage for dual gauge equipment is when the time comes to dispose of our trains. The “500,” my 4-4-0, was built in 1957 by Jim Turnbull of Montreal. I am the 6th(?) owner of the engine and it still runs! Obviously, our equipment will out last all of us. The “500” is 7-1/4” gauge only. Changing the gauge would require major surgery including new axles. My Shay, on the other hand, has axles long enough for 7-1/2” gauge with a spacer on the end. By removing the left hand side frames, the gauge can be changed in just a few hours. Recently, a sale was made via Discover Live Steam of a 7-1/2” gauge Big Boy to someone in New Zealand. They had it re-gauged to 7-1/4” gauge. What a nightmare that must have been, unless the builder made allowance for such a change! When the time comes to sell, whether by you or your estate, if allowances for easy gauge change have been built into the equipment, anyone in the world is a potential buyer.
My buddy Alan Francis designed a really slick way to easily change gauge on equipment with an outside frame.

He cuts two grooves in the axle for retaining rings. A hub on the inside attached to the wheel, allows the wheel to slide from one gauge to the other. Screws on a locking collar, lock the wheel in place at the desired gauge. He uses a key when the axle is driven (diesel locomotive). The difference of a 1/4 inch is not noticeable when looking at the truck.

Steam locomotives usually have inside frames. That makes changing the gauge a little more challenging. The frames have to be narrow enough for 7-1/4 inch, but the cylinders have to be spaced wide enough for 7-1/2 inch gauge. I have also seen engines with a tire, able to slide in and out on a wheel.
Stay tuned to see how I solve this problem on my 4-8-0.

Hi Tim,
Additional info on track gauge.
Went Mike and I went to the Spring meet in Riverside LS a couple of years ago, I spoke with a member out there who had an old model railroading magazine, perhaps from the 50’s that had an interview with Les Friend from Massachusetts. The content of the interview was about the Live Steam hobby that we enjoy at the club. Now Les Friend from Mass. was selling parts for 3/4 and 1 inch scale, I believe, but should have know about the 7-1/4 inch track gauge that we use. Well as the story goes, Les Friend gave the correct info to the interviewer, but somehow the article ended up with the track gauge of 7-1/2 instead of 7-1/4. Back in those days, typewriters may have had keys with 1/4 and 1/2 symbols on the keyboard. Also the person who was supposed to proof read the article, missed the detail and then went to print and was documented in the error of 7-1/2.
That member took my name and address and was supposed to make a copy of the article and send to me. Well, so far I haven’t heard from him.
Another mystery, unsolved.
Dave Wierowski
________________________________
LikeLike
Hi Tim,
For widening the gauge without messing with the axles you can turn the wheels straight and sweat on steel tires and set the tires for 7.5″ gauge. This way you don’t need to mess with the axles, eccentrics and crank pins
Jeff
LikeLike
How do you change it back to 7-1/4 gauge? My home club and many other tracks in the northeastern US (and most other countries) are 7-1/4 inch, but I want to take my engine to 7-1/2 gauge tracks…
LikeLike
Unfortunately there isn’t an easy way to change it back once the tires are sweated on. I saw a guy who had tires that were not sweated on but were a close fit and he used set screws through the rim to dig into the ID of the tire. He said that he could change gauges pretty easy by unlocking the set screws, sliding the tire and then relocking the set screws but he also had the set screws loosen up and the center spin in the tire.
LikeLike